Showing posts with label nails. Show all posts

Wednesday, 17 February 2016

We may be nearing the end of February, but around here spring isn't going to start showing it's face for at least another month. Planning on spending the rest of winter bundled up from head to toe? Why not include a warm and cozy design for your nails!
Before getting started you may want to check out my tips and tricks for getting the best results from your nail art stamper.

For this nail look I started with a Covergirl's Speed of Light for a light taupe-grey base. The pattern was created using this winter-themed plate from Born Pretty and the Konad White Stamping polish. I have to say, using the Konad brand polish made a huge difference in achieving a crisp, opaque design. While I've had plenty of success using various branded polishes in other designs, this was the best white I have tried by far!

Has winter let up at all yet where you live?

keep up with me: bloglovin' | instagram | pinterest | twitter
xoNadia

Monday, 4 January 2016


Happy New Year friends! Anyone else not entirely looking forward to getting back into the regular swing of things at work/school? Well to soften the blow, let's get back to talking about the best of the best from 2015! Last week was all about skincare standouts, and today we'll be getting into the best of the best hair & nail care products of the year!

Hair Care


Live Clean Apple Cider Shampoo | I still haven't found my perfect everyday shampoo, but this clarifying shampoo made a big impression on me this year. It does the job of getting rid of any build up of product (I am a dry shampoo junkie after all) but always leaves my hair feeling soft and looking shiny - something I've never experienced from a clarifying shampoo!

Bumble & Bumble Invisible Oil | If you've been opposed to the feel or weight of hair oils in the past, you're going to want to give this one a shot. It is incredible at smoothing and protecting my hair without feeling thick or heavy. I got this last Christmas and have only used a quarter of the bottle, talk about value!

Macadamia Deep Repair Hair Masque and my It's a 10 Miracle Leave-In are two time winners  for the best moisturizing tag team for my hair. I tried so many other conditioners and leave in products but none could knock them out of the top spot!

Hair Styling


Batiste XXL Volume Dry Shampoo | If you've been following for any length of time you'll know that Batiste is my #1 when it comes to dry shampoo. This year the XXL version came into the picture for when I wanted long lasting volume in my super fine, flat hair. It adds a ton of grit and texture that allows the hair to build on itself without the need for teasing, but isn't super messy and doesn't leave my hair feeling greasy the next day like some other volume powders I've tried. 

The Wet Brush | My hairstylist used this once on my hair this year and I bought it on the spot. It's the best thing I've ever used for detangling damp hair! I still use last year's winner for the majority of my dry hair detangling, but this has taken the top spot for use after the shower!

Croc Clips & Meta Grip Bobby Pins | I almost completely abandoned the hair tie in favour of clips for overnight hair styling. Using bobby pins for my nightly top knot turned my naturally frizzy curls into voluminous waves, and the crocodile clips made original styling and keeping my styles in kink free a breeze.

Nail Care


ORLY Bonder Base Coat | Since my favourite Revlon Colourstay Base coat was discontinued, I had to go on a hunt this year to find a replacement. ORLY was the standout as the rubberized formula is amazing and gripping onto colour and extending the wear.

L'Oreal Infallible Nail Colour | The infallible formula was my favourite discovery of the past year, and I wore it on my nails all the time through the winter and fall of 2015. I even did a full review showing how it faired through nearly two weeks of wear time, and the results were amazing!

Essie "Ignite the Night" | The top polish shades of 2014 continued to live on my nails this year, but this shade is the most memorable new colour purchase I made in 2015 because it is literally so stunning on the nails! 
Sephora Instant Nail Polish Remover | Last, but definitely not least, this nail polish remover completely changed the game for me this year. It makes removing polish (even glitter!!) so quick and painless, that changing up polish colours was way less time consuming! No mess and no bulky packaging means this will likely have a permanent spot in my nail drawer for years to come!

Phew that was a long one! Is there anything in the hair/nail department I'm seriously missing out on? Let me know, and look for the grand finale of the Hit List coming on Wednesday: standout beauty products of the year!

keep up with me: bloglovin' | instagram | pinterest | twitter
xoNadia

Thursday, 8 October 2015

It's been a hot minute since I did a nail post, so I thought with the changing of the seasons I would get some inspiration from all the deep colours and textures of fall! This manicure is super simple, but definitely still makes a statement.
L-R: Essie Bahama Mama | Wet N Wild Matte Topcoat | Revlon Plum Seduction
Since I'm all about simple nail art that packs a punch, the only tool needed outside of your nail colours is tape! I use painters tape specifically because it is less sticky and less likely to disturb the polish underneath.
The more opaque the polishes that you use the better, since the colour blocking requires at least three different layers of polish. Start with the lightest shade as a base and allow it to dry completely. Using the painters tape create any sort of shape that you prefer then paint over with the darker shade. Remove the tape before the polish has started to dry for crisp, clean lines. Wait for it to dry and top with a matte topcoat for a suede finish!

Are you into matte nails?


P.S. I'm over on Miss in the Midwest today sharing some of my favourite lipsticks for fall - hop on over to Karly's blog to see my picks for this season!

 
keep up with me: bloglovin' | instagram | pinterest | twitter
xoNadia

Wednesday, 8 July 2015

If you're looking for an easy way to create more complicated nail art designs, there are two ways you can go about it: nail wraps or stamping. While wraps are quick and generally last for long periods of time, they can be more on the pricey side and are one time use. Nail stamping plates, on the other hand, are very inexpensive and can be used multiple times to created many different designs. Today I'm going to give you some of my tips & tricks for getting fun nail art like these summer Aztec nails!
Stamping requires a bit of trial and error when you first start out, but hopefully with these tips you'll be on your way to easy stamping in no time. The plates I have used were sent to me from Born Pretty Store, and they have so many patterns to choose from!

1. Not all polishes will be ideal for stamping.
While there are polishes specifically designed for stamping, regular nail polishes can work on stamping plates if they are thicker in formula and opaque in colour. Since stamping is a one-coat type of deal, anything to thin or sheer won't show up well.
2. An old gift card or credit card work better for scraping.
Most of the time stamps will come with a scraper of some sort. In my experience, and from what I've read/seen from others, these are not generally the easiest tools to work with. Instead, just use an old gift card or credit card!

3. The type of stamper you have will determine how much pressure you use to pick up the images.
When I first tried stamping, I didn't understand why my stamper wasn't picking up any of the images. It wasn't until I read a blog post on all of the different types of stampers that I realized I was using mine incorrectly! Hard rubber stampers require a lot of pressure when picking up designs, but softer gel stampers only need a slight bit of pressure to pick them up. This will likely be where you need to play around and determine for yourself what your stamper needs, but don't assume that more pressure is always better!

4. When picking up the image, work quickly, when placing it on the nail, take your time.
You'll want to work quickly to apply the polish, scrape it over the design, and pick it up with your stamper, but lining it up correctly on the nail makes a big difference with the final look so don't rush!

5. If you mess up, you don't have to start again.
If your placement of the stamp doesn't look like you want it on the first time around, don't panic! You can remove the stamped image without having to reapply your base colour by ensuring that you are stamping over a fully dry nail with a top coat. I've heard that clear tape will work to remove the images, but since I didn't have that on hand I used a tiny bit of remover on a lint-free cotton pad and light pressure to remove the stamped image only. Just reapply your top coat and wait for it to dry before trying again!
Here is what I used to create the design above:

I started with two coats of white polish as my base then topped it with the Insta-Dry Top Coat. For the stamped images I used the QA66 plate from Born Pretty Store, using the same image for both the accent nail and tips. For the accent nail I used the full design with the Wet N Wild Black polish and rolled it onto the entire nail with my Born Pretty Store stamper. For the tips, I used a neon pink polish and just placed the edge of the pattern on the tips of the nails using more of a stamping motion.  Both of the black and pink polishes had a thick, opaque finish so they worked just fine with the stamping plates. Make sure you clean off your plate and stamper each time! 
The total cost of the plate and stamper come in at under $8 (even less if you use the code SSEG10 for 10% off your order), and just think of all the different design combinations you could make!

Have you ever tried nail art stamping? Any tips to share?

keep up with me: bloglovin' | instagram | pinterest | twitter

xoNadia

Monday, 4 May 2015

When it comes to nails, I'm all about the DIY. Unless it's a special occasion, I much prefer to do my own nails in the comfort of my own home than have them done at the salon. Doing your own nails can be a process, but with a couple of awesome tools I feel I can get professional looking nails in just a few minutes!
 Step 1 | Tame those Cuticles
A few months ago I finally picked up the Sally Hansen Instant Cuticle Remover and it was a serious game-changer when it comes to at-home manicures. Apply it to the cuticle area, let it sit for a few seconds, then use a cuticle pusher to remove all of the excess skin. It's quick and simple and makes it easy to get a professional look at home.

Step 2  | Shape
When it comes to nail clippers, I'm not picky, but files are a whole different story. A glass or crystal file not only saves you the cringe-worthy feeling/sound of filing nails with a traditional emery board, but it gives the smoothest finish and lasts basically a lifetime.

Step 3 | Lay the Base
Base coats are one of the most important steps when doing your nails - they adhere the polish to the nail bed to help your mani last longer, and protect the nail from yellowing. My holy grail used to be the Revlon Colourstay Base Coat, but since that has been discontinued I've been loving using ORLY's Bonder. It's quick drying and creates a "rubberized" layer that truly helps increase the longevity of any polish on top.

Step 4 | Colour & Clean Up
After applying my nail colour of choice, I use a small synthetic brush dipped in nail polish remover to go around the edges and clean up any areas that I may have gone beyond the lines. This gives you a clean, professional final result! This one sent to me by Born Pretty Store (use the code SSEG10 for 10% off) doubles as a dotting tool which is a great for achieving easy nail art designs.

Step 5 | Seal It
The worst part of doing your own nails can be the time you're left waiting for your mani to dry, am I right? After recently repurchasing the Sally Hansen Insta-Dri, I don't know why I ever stopped using it! With this top coat the nails are dry to the touch in just a few seconds.

Step 6 | Maintain
I have very dry hands so a cuticle cream is necessary for keeping everything looking it's best. Lush's Lemony Flutter is amazingly moisturizing and smells pretty heavenly. I'm still working on a sample that I got last year, so the full size would probably last you forever! I apply this once my nails are fully dry and I'll use it a couple of times a week while I'm at work or before bed to keep everything smooth and moisturized.

Do you do your own nails? Any tips that I need to know?

keep up with me: bloglovin' | instagram | pinterest | twitter
xoNadia

Wednesday, 1 April 2015

A few weeks ago I came across the Pantone Spring 2015 Colour Report and instantly fell in love with the whole palette. Since multi-colour nail art isn't something I wear on a regular basis, I was inspired to try and incorporate as many colours as possible into something that would be both simple and wearable.
 And this is what I came up with! After loving the striping tape I received from Born Pretty Store in my colour block mani a few months back, I decided it would be the perfect tool for getting these crisp peek-a-boo coloured stripes. Here's how you can accomplish the same look yourself:
STEP 1 | Paint each nail with a different shade you want showing as the stripes in the final look. I went for: Tangerine, Aquamarine, Strawberry Ice, Lucite Green, and Toasted Almond. Make sure you let these colours dry completely before moving on.

STEP 2 | Apply nail striping tape in whatever pattern you'd like to show through on the nail. Make sure you remember what order you've layered them!

STEP 3 | Doing each nail individually, cover the nail and striping tape with one coat of an opaque white polish, I used Sally Hansen White On, and before letting the white coat dry peel off the layers of tape to reveal the colour underneath.

STEP 4 | Allow the nails to fully dry, and seal the design in with the topcoat of your choice. I decided to go matte since it gives a nice soft look, but it looks just as good with a shiny finish.

And you're done! Which of the Pantone spring colours are you most excited about this year?

keep up with me: bloglovin' | instagram | pinterest | twitter
xoNadia

Wednesday, 11 February 2015

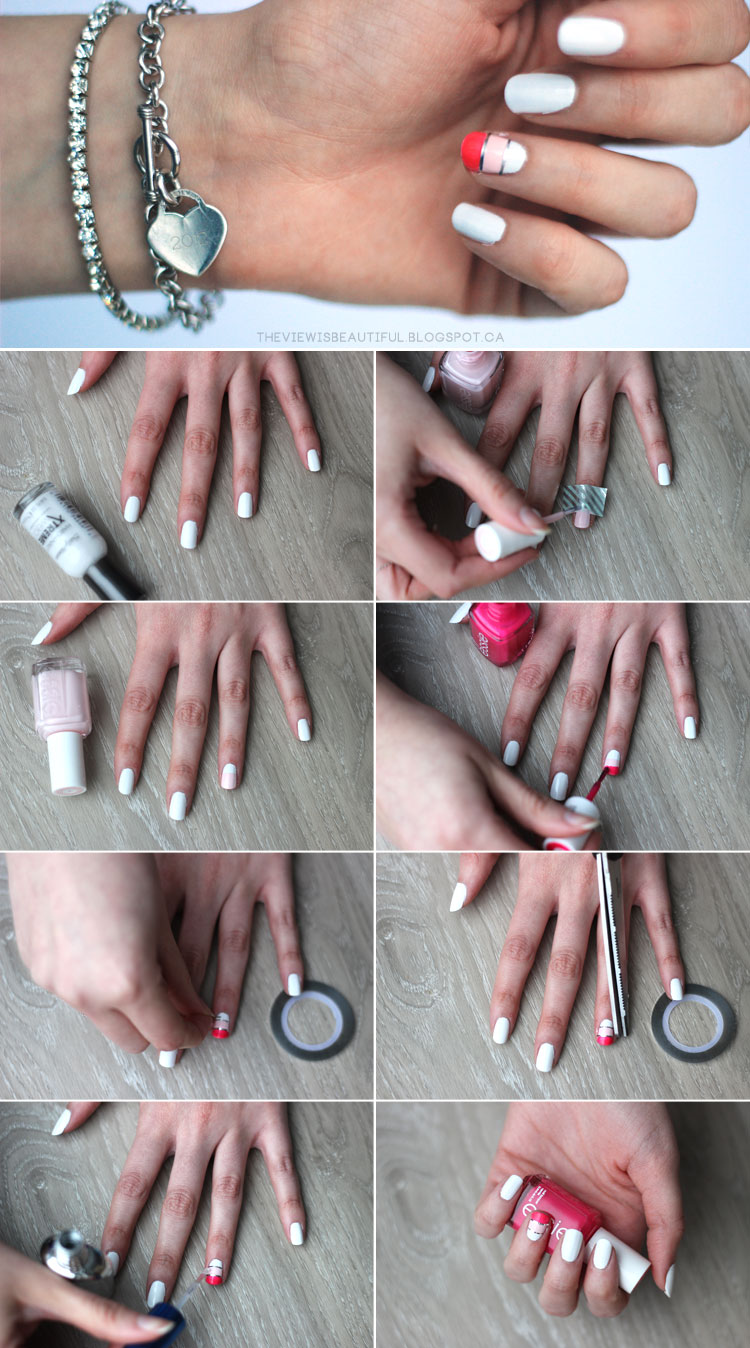
Keeping on the Valentine's Day train, today I bring you a super easy nail art tutorial that is perfect for V-Day, or really any day! Last year I shared a simple way to achieve a metallic french tip, or a glitter gradient nail look - can you tell I'm a fan of shine?  Born Pretty Store was recently kind enough to send me a few nail goodies, and I have to say this metallic striping tape is probably the easiest way to add some extra interest to a simple design!
Valentine's Gradient Colour Blocked Nails | via theviewisbeautiful.blogspot.ca
White Polish: Sally Hansen | Pale Pink: Essie | Bright Pink: Essie
Nail Tape: c/o Born Pretty Store
  1. Start out with two coats of an opaque white polish. Allow to dry.
  2. Add the pastel polish to two thirds of your nail. Not so great at free-handing straight lines? Use washi or painters tape to create clean lines, but be sure to remove the tape before the polish dries!
  3. Repeat the same process to apply the brightest shade to the last third of the nail. Allow polish to dry fully.
  4. Apply a small pieces of nail striping tape to cover the lines between colours.
  5. Trim off excess tape. Nail or eyebrow scissors work best for getting as close to the nail as possible.
  6. Seal the tape in with a layer of clear polish.
Now that wasn't so hard was it? Born Pretty Store is already ridiculously inexpensive and offers free shipping worldwide, but they have also offered an additional 10% discount to my readers if you use the code SSEG10!

What's your favourite way to amp up your manicure?

keep up with me: bloglovin' | instagram | pinterest | twitter
xoNadia

Monday, 5 January 2015

We've already covered my favourite Beauty and Hair/Skin/Body products of the 2014, so today we finish up my Hit List series for this year talking about my favourite nail polishes and beauty tools!
Winter of 2014 was all about the greige-taupe  polishes - Metro Chic by Sephora is no longer sold but L'Oreal Eiffel for You is pretty close and a beautiful colour as well. There's just something about a warm grey with a hint of purple looks so classy and sophisicated right?

During the spring I got a ton of use out of my JulieG 9 to 5 polish - a bright creamsicle-peach that looks like a pastel inside but glows like a neon in daylight. I got so many compliments every time I wore this colour, it is seriously stunning and unique!

This summer I discovered my perfect nude polish - Essie's Topless & Barefoot. Its slightly pinky-undertone made it the perfect pairing for my cool toned skin. This barely ever came off my nails all summer long because it just went with everything and looked great with a tan.

You probably already guessed you would see Essie's Bahama Mama on this list. I was obsessed with this colour all throughout the fall and included it quite a few posts. It's the perfect opaque deep berry-burgundy cream that looks great on fingers and toes, and lasted a surprisingly long time on my nails.
I was considering investing in an expensive blow dryer this year, but when I was caught out of town for a wedding without a blowdryer, I picked up the Remington T-Studio Ceramic Dryer and was blown away, no pun intended, by how smooth and soft it made my hair feel. For under $40 it was an amazing steal!

The Sephora Crystal Nail File, or really any glass nail file, has become an essential part of my nail care routine. They might seem like an expensive tool for what they are, but don't be fooled. Nothing gives you as smooth and cringe-free of a file as glass - plus they never dull!

How in the world does the Tangle Teaser work? I have no idea, but it's been a favourite of mine for two years running now. Somehow this little pink wonder manages to untangle my fine and curly rats nest of hair with reletive ease and way less pain than any other brush I've owned.

Costal Scents Angled Foundation Brush and my hands were my go to for liquid foundation this year. The fact that this brush is super dense and has an angled shape makes it a breeze to blend foundation even in the awkward spaces around your nose. It also dries surprisingly fast after washing compared to my other synthetic kabuki brushes, which is a nice bonus!

Real Techniques Blush Brush was an amazing find this year. The tapered shape makes it perfect for blush, brozer, powder, highlighter, you name it. It's super soft and gives me a great finish on my cheeks. When I consider purchasing more than one, you know it's a winner.

Tweezerman Travel Tweezers are not only less expensive than their original siblings, but they are mini so they can get to the finest of eyebrow hairs and help place fake eyelashes like nobody's business. 

If you ready my skin & body care favourites you'll know I got into self-tanning this year, and let me tell you getting a Tanning Mitt or two is so worth the minimal investment. They blend in the product better than any gloves could do and leave you with a smooth streak-free result. 

And finally, I brought back the Scrunchie from the 90s. No, not in public, but as the absolute best way to keep my baby fine hair from developing hair elastic dents when tied up during the night! Using a scrunchie to put my hair in a high pony or bun before bed puts less pressure one one spot of the hair, and actually helps to give me more volume when I wake up the next day.

If you made it to the end of this post, thanks so much for sticking with me! Now it's your turn: any polishes or beauty tools that need to be on my radar for 2015?

In case you can't get enough of favourites from 2014, you can pop on over to Ivory Avenue to see what made the list for my favourite beauty trends of the year!
 
keep up with me: bloglovin' | instagram | pinterest | twitter
xoNadia

Monday, 29 December 2014

Well hello again, I hope you all had a fantastic Christmas and managed to fit some relaxation into the hectic last week! Getting back into the blogging groove after a short vacation, (read & see what I got up to on Twitter & Instagram) and to kick off the new year, I'll be bringing you a new post every day this week! As New Year's Eve is right around the corner, I thought it would be appropriate to share how to add a bit of festivity into your look, even if you'll just be parked on the couch watching the ball drop at midnight.

Matte & Metallic
Revlon's Midnight Affair makes a perfect deep blue base that looks absolutely gorgeous when transformed with a matte topcoat. Using a reflective silver (Nicole by OPI Positive Energy) to add some metallic french tips (easy tutorial here) gives a stunning contrast for the drama of the occasion!

Full on Glitter
Essie's Hors D'oeuvres is the perfect holiday sparkle for layering over any colour, but I especially love it on top of silver for New Year's Eve. It's subtle for a glitter nail, but still packs a punch under low light.

Colour of the Year
2015 is the year of Marsala, a rich deep red-brown, so why not incorporate it into your manicure? Using L'Oreal Infalliable Always a Lady as a base and adding a stripe of gold glitter (Sephora by OPI Only Gold For Me, similar) makes for a beautiful colour combo and a little bling.

Metallic Gradient
I've already done a full tutorial on how to achieve these rose gold gradient nails, but as they're my favourite twist to an average manicure, I just had to include them! Essie's Topless & Barefood and Orly Rage are my favourite combination that will go with any New Year's Eve outfit.

Neutral Half Moons
Reversing the idea of the metallic french tip, a half moon makes for a little more unusual choice. Using L'Oreal's Eiffel For You as a base really lets the metallic silver take centre spotlight!

What manicure are you going to be rocking to ring in the new year?
 
keep up with me: bloglovin' | instagram | pinterest | twitter
xoNadia

Wednesday, 26 November 2014

I am generally one of those people who is obsessed with reading about organization, but is not very good at finding and sticking to a good system. I've noticed lately that I seem to be in a pretty good place with my beauty storage, so I thought I would share some of my solutions with you over the next few weeks. First up: Nails!
I keep all my supplies in the bottom drawer of my bedside table for two reasons: practicality and functionality. I'm very much of an "out of sight out of mind" type of person, but having all I need so close to my bed really reminds me to actually use my products on a regular basis. Also, I usually do my nails in bed so there is really no excuse for leaving bottles of polish strewn all over the room when I can just bend down and put them away immediately after use. Keeping the polishes in a separate box means they can all be moved quickly and neatly to another space if need be.
Since I'm always looking at them from above, I learned that to keep myself organized I had to find a way to see the colours from the top. I had seen some people paint dots on the top of the bottle, but I still wanted to be able to see the shade names underneath so instead I painted white page reinforcements and stuck them to the labels.

Most of you would probably stop at this point but I like to take it one step further and arrange the polishes by use/colour. I keep base coats/top coats and neutrals on the side closest to me since they are my most reached for products, and then from there filter down through shades. Since we're in fall/winter season I'm gravitating more towards metallics, deeper shades and glitters at the moment and leaving my brights and pastels in the back for when I rearrange for spring/summer.
In the back of the drawer I keep my reinforcements, which as mentioned I use for identifying polish colours, but also for simple nail art like this look I did a post on last year. In a little glass container I keep all my grooming/shaping tools: nail clippers, files and buffers (glass files are an absolute must for smooth nails!). I usually keep a separate container for cotton pads and qtips for touchups but I was running low so I tossed them all in one to keep it simple.
Up at the front I keep some more essentials. First, a mini bottle of polish remover that I'm hoping to soon replace with the kind that allows you to pump out the product (any suggestions on brands?). Second, I have my bottle of Seche Restore, which I don't actually use with Seche Vite since I don't own any. This stuff is like magic for making your older polishes that are starting to dry out/thicken like new again! I have used it coutless times to bring some of my favourite discontinued shades back to life.

Finally, I have two different hand creams, one of which I will use either after everything has dried or before bed. The True Blue Shea Cashmere Hand Cream leaves your hands feeling like silk, but it has a pretty strong sweet scent that I sometimes find overpowering. When I'm looking for something unscented I'll use this Cetaphil cream that I got as a sample. It is really meant for the body, but is pretty lightweight so it makes a decent hand cream. Once I finish this one I'll be replacing it with my all time favourite which is the St. Ives Skin Renewing lotion, since it is completely non-sticky and smells amazing.

What do you use to store/organize your nail care products?

keep up with me: bloglovin' | instagram | pinterest | twitter
xoNadia

Wednesday, 10 September 2014

By now you all probably know I am a big nail polish fan. It's an easy and inexpensive way to accessorize for the season! You may have already read my picks for Summer, so it's about time to change things up and focus on some of the moodier colours for fall.

Revlon Plum Seduction {exact} | Sally Hanson Flirt {similar}
Sephora by OPI Metro Chic {similar/similar} | Orly Rage {exact} | Revlon Midnight Affair {exact}
If you're not ready to let go of your bright colours a "radiant orchid" shade is perfect to pull into the autumn. Revlon's Plum Seduction is a darker pinky-purple shade that is opaque in two coats and wears beautifully.  Moving closer to the darker end of the spectrum, Sephora's Metro Chic colour is always a go to for fall because of its dusty grey-purple tone. This colour is discontinued but both Area Gray by Sally Hansen and Formula X Bonded 2U will give you the same effect.

If you're a fan of dark nails but don't want to go all the way to black, deep burgundy and navy shades are my favourite ways to do dark. Sally Hansen's Flirt is still on their website but I haven't seen it in stores recently. Wine Stock from their gel formula line is probably what I will be trying out next since my bottle is due for replacement. Revlon's Midnight Affair is a classic deep navy with the tiniest bit of shimmer. Can't you see both of these looking beautiful with a matte top coat?

Finally, I am especially drawn to metallic tones during the Fall. Orly Rage is no stranger to this blog because it is my top pick for metallic polish. It is highly reflective, super opaque, and dries quickly, so it's my go to when I'm looking for a quick colour swap. You can see it in action here and here.

Do you change up your polish colours for fall? What are your top picks?
 
keep up with me: bloglovin' | instagram | pinterest | twitter
xoNadia

Sunday, 25 May 2014

I love the look of gradient nails, but nothing speaks to me quite like the pairing of neutrals and metallics. I've already talked about an easy technique to get the typical french tips with a metallic twist, so here's an easy way to take the metallic tip to the next level.

Base coat: Sally Hansen White Tip | Tips: Orly Rage | Top Coat: Sally Hansen Mega Shine

1. Make sure your base colour is opaque and completely dry before you attempt to add the gradient. Grab a cosmetic sponge and scrap piece of paper and you're ready to go.

2. Place a blob of your metallic polish of choice (it works best with polishes that have a very fine glitter base) on the paper and pick up the polish with a flat edge of the sponge. Tap off most of the polish on the paper (especially on your first round of sponging) so there is only a light layer on the sponge.
 
3. Start at the tip and gently pounce the sponge on the nail, covering the entire width of the nail before moving down towards the cuticle. Use lighter pressure has you move down the nail so that the metallic polish fades out completely.
 
4. Dip the sponge back in the polish and repeat the step, staying closer to the tip of the nail to build up the colour. Repeat until you have the desired intensity at the tip.

And you're done! It may take some trial and error to figure out exactly how much polish/pressure to use, but you'll pick it up in no time.

Base coat: Essie Topless and Barefoot | Tips: Orly Rage | Top Coat: Sally Hansen Mega Shine

White was the easiest to see in pictures, but one of my favourite ways to wear this look is actually to pair it with a nude polish. The final look is really subtle, but super pretty especially in natural light.

So, will you give this look a try?

keep up with me: bloglovin' | instagram | pinterest | twitter


 photo tvibsignature_zps27898c75.png

Sunday, 23 February 2014

Days are getting longer, temperatures are rising and the sun has finally come out to play. Spring is on it's way, finally. What better way to start incorporating a bit of the coming season into your wardrobe than with a spring inspired mani? Here are some of my top budget picks.


Looking for a less expensive dupe for Essie's famous Bikini So Teeny? Revlon's Dreamer comes pretty close with just a little less of a purple hue. If you're looking for something sheer and neutral, Finger Paint's Pastel-Me More is a beautiful pearly peachy-pink that looks very polished and chic. Mint Sorbet by Sally Hansen is a great budget pick for the mint craze that doesn't seem to be going anywhere fast. Julie G 9 to 5 is a beautiful bright creamsicle colour that I get compliments on every time I wear it. It looks subtle indoors but seems to glow once you step outside. And finally, Revlon's Gum Drop is a soft lavendar that actually smells like candy. Strange, but the colour is very flattering without being too bold.

What's your favourite polish pick for spring?
 
keep up with me: bloglovin' | instagram | pinterest | twitter


 photo tvibsignature_zps27898c75.png

Saturday, 8 February 2014

Base colour: Essie Fiji | Tips: Orly Rage | Top Coat: Sally Hansen Mega Shine

If you work in a corporate setting like I do than it's pretty likely you won't be able to get away with the typical hearts and glitter themed nail art. That doesn't mean that you can't be festive in a subtle way! How about a pink and rose gold French manicure? It's simple and classic with a bit of romantic twist. If you have trouble keeping a steady hand to to French mani's at home, try using page reinforcements to get a nice crisp line. Top it all off with a shiny top coat and you'll have a cute, polished look appropriate for any occasion!

What are you going to be sporting on your fingertips this Valentine's day?


keep up with me: bloglovin' | instagram | pinterest | twitter
 photo tvibsignature_zps27898c75.png 

Tuesday, 31 December 2013

New Year's Eve is upon us and while different plans call for vastly different outfits, nails are something that can be glammed up no matter the occasion! As I've mentioned before, I'm a bit of magpie when it comes to sparkle, and what better time to go full out then New Year's. Here are my top picks for NYE nails in a range of prices and shades to compliment whatever you are wearing to ring in 2014.

Orly Rage // Essie Hor D'oeuvres // China Glaze Loreli's Tiara // Revlon Facets of Fuchsia // Deborah Lippman Cleopatara

For those who can't be fussed with glitter or may be going glitter crazy for makeup or outfit, Orly Rage is the perfect glamorous accompaniment to a NYE ensemble. If you're into beauty or fashion you know that rose gold is just massive, and conveniently can pair with any other gold or silver jewelry. You can find Orly polishes at Sally's Beauty Supply.

Another chameleon polish is Essie's Hor D'oeuvres. This has been my favourite for the holiday season. It has flecks of silver and gold, and boy does it shine. I believe it is part of their holiday collection, available at most drugstores.

Loreli's Tiara is what I think of as a classic New Year's Polish. The most packed glitter I own, this silver-blue polish is crazy beautiful and guaranteed to get noticed. China Glaze polishes are also found at Sally's.

Another drugstore contender that is a little more subtle, Revlon's Facets of Fuchsia, though it may be called something else in some locations, is a great option for those who don't want in your face glitter. I recommend putting down a black polish first as the black base in this is fairly sheer, but this is still a great contender especially if you want to add a little colour outside of the typical black gold or silver.

And finally, the most expensive out of the bunch, Deborah Lippman's Cleopatara. I got this in a Sephora set for Christmas and it just screams New Year's to me. A little less glitz than Loreli's Tiara, but still striking.

I am still debating which of these lovely polishes I'm going to be sporting tonight, but as with most things in my life, it will probably be a game time decision. That's the beauty of nail polish: slap it on, apply a quick dry topcoat and you're ready for whatever!

Which of these sparkles catch your eye?

Whatever shenanigans you may be up to tonight, I wish you a safe and Happy New Year's, and look forward to a special treat from me for the start of 2014!